Spooky Baked Halloween Chips – Easy Party Treat
Spooky Baked Halloween Chips are about to become your new favorite hauntingly delicious treat! As the autumn leaves turn crisp and the nights grow longer, there’s nothing I love more than conjuring up some fun in the kitchen for Halloween. These aren’t just any chips; they’re a delightful twist on a classic, transformed into something truly magical and, dare I say, a little bit spooky. What makes these spooky baked Halloween chips so special is their incredible versatility and the sheer joy they bring to any Halloween gathering. They’re a fantastic alternative to store-bought snacks, allowing you to customize flavors and shapes to perfectly match your eerie aesthetic. Plus, baking them means you get that satisfying crunch without all the greasy guilt of frying, making them a guilt-free indulgence for all your trick-or-treaters and party guests alike. Get ready to amaze everyone with these simple yet show-stopping spooky baked Halloween chips!

Spooky Baked Halloween Chips
Looking for a fun, easy, and spooky treat to serve at your next Halloween gathering? These Spooky Baked Halloween Chips are the perfect answer! They’re customizable with your favorite Halloween cookie cutters, incredibly simple to make, and a delicious alternative to store-bought chips. Plus, they’re baked, not fried, making them a slightly healthier option for your little ghouls and goblins (and the grown-ups too!). We’re using just a few simple ingredients to create these crispy, savory delights. Get ready to impress your guests with these festive and frightfully good chips!
Ingredients:
Instructions:
Preparing Your Tortillas for Spookiness
The first step in creating our Spooky Baked Halloween Chips is to prepare the tortillas. This involves getting them ready for their transformation into crispy, delightful shapes. You’ll want to work with your tortillas one at a time to ensure even coating and cutting. Lay a single flour tortilla flat on a clean, dry surface. Now, take your spray avocado or olive oil and lightly mist the entire surface of the tortilla. You don’t need to drench it; a gentle, even coating is all that’s required to help the salt adhere and to encourage crispiness as they bake. Think of it as creating a perfect canvas for flavor.
Cutting Out the Creepy Creations
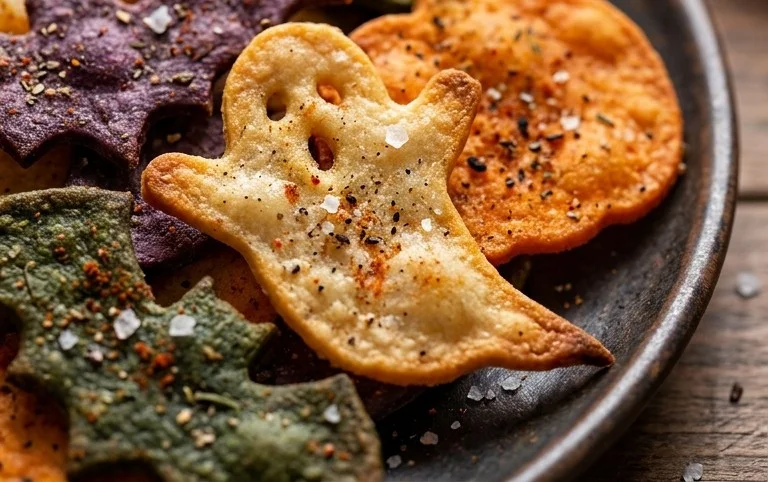
This is where the fun really begins! Once your tortilla is lightly oiled, it’s time to bring out the Halloween spirit with your cookie cutters. Select your favorite spooky shapes – think bats, ghosts, pumpkins, or even little Frankenstein heads! Press the cookie cutter firmly into the oiled tortilla, making sure to cut all the way through. You might need to wiggle it a bit to get a clean cut. Carefully lift the cut-out shapes from the tortilla, leaving the remaining tortilla scraps behind. These scraps are also delicious, so don’t discard them! You can bake them as is or cut them into smaller pieces. Repeat this process with the remaining tortillas, using as many spooky cutters as you desire. Try to get as many shapes out of each tortilla as possible to minimize waste. If you have a lot of smaller leftover pieces, you can arrange them on the baking sheet and they will become wonderfully crunchy “mini-chips.”
Seasoning for Maximum Flavor
After you’ve cut out all your spooky shapes, it’s time to add that essential savory flavor. Arrange your cut-out tortilla shapes in a single layer on a baking sheet. Ensure they are not overlapping, as this will prevent them from crisping up evenly. If you don’t have enough space on one baking sheet, use two. Now, lightly spray the tops of the cut-out shapes with your chosen oil. This second light misting will help the salt stick and add another layer of crispness. Immediately after spraying, sprinkle a generous pinch of salt over the shapes. You can adjust the amount of salt to your personal preference. For a little extra flair, you could also consider adding other seasonings at this stage, like a pinch of garlic powder, onion powder, or even a tiny bit of paprika for a hint of color and flavor, though simple salt is wonderfully effective.
Baking to Golden Perfection
Now that our spooky shapes are prepped and seasoned, they’re ready for the oven. Preheat your oven to 350 degrees Fahrenheit (175 degrees Celsius). This moderate temperature is ideal for baking the chips until they are golden brown and crispy without burning too quickly. Carefully place your baking sheet(s) into the preheated oven. The baking time will vary depending on your oven and the thickness of your tortillas, but generally, you’ll want to bake them for about 8 to 12 minutes. Keep a close eye on them, especially during the last few minutes, as they can go from perfectly golden to burnt very rapidly.
Cooling and Serving Your Hauntingly Good Chips
Once your Spooky Baked Halloween Chips have reached that beautiful golden-brown hue and feel slightly firm to the touch, it’s time to take them out of the oven. Carefully remove the baking sheet from the oven and let the chips cool directly on the baking sheet for a few minutes. This allows them to continue crisping up as they cool. After they’ve cooled slightly, you can transfer them to a wire rack to cool completely. This ensures that no steam gets trapped and they achieve maximum crispness. Serve these spooky delights with your favorite dips, such as salsa, guacamole, or a creamy cheese dip, for a truly festive Halloween treat that’s as fun to look at as it is to eat! They are best enjoyed the day they are made, but can be stored in an airtight container at room temperature for a day or two if you have any leftovers.
Conclusion:
So there you have it – your guide to creating utterly delicious and perfectly Spooky Baked Halloween Chips! These aren’t just any chips; they’re a fantastic way to add a homemade, healthy-ish crunch to your Halloween festivities. Baking them instead of frying makes them a guilt-free treat that everyone can enjoy, and the customizable seasoning allows for endless flavor adventures. They’re wonderfully crispy, satisfyingly savory, and the perfect canvas for all sorts of spooky designs if you’re feeling artistic!
I love serving these alongside my famous monster guacamole or a creamy, cobweb-drizzled dip. They’re also brilliant for filling goodie bags or as a fun snack during a Halloween movie marathon. Don’t be afraid to experiment with your favorite spices! Think smoky paprika for a fiery skeleton effect, garlic powder for ghostly apparitions, or even a touch of chili for a zesty pumpkin spice blend. I truly encourage you to give these Spooky Baked Halloween Chips a try. They’re simple, adaptable, and guaranteed to be a hit!
Frequently Asked Questions:
Can I make these ahead of time?
Yes, absolutely! Spooky Baked Halloween Chips can be made a day in advance and stored in an airtight container at room temperature. They might lose a tiny bit of crispness, but they’ll still be delicious. For optimal crunch, I recommend enjoying them the day they’re made.
What kind of potatoes work best?
You can use almost any potato for this recipe! Russets are a classic choice for their starchy texture which yields a great crisp. Yukon Golds offer a slightly creamier texture and lovely golden hue. Even sweet potatoes work wonderfully, giving you a naturally sweet and vibrantly orange chip, perfect for Halloween!
How do I get them extra crispy?
Ensuring a single layer of chips on the baking sheet is crucial for even cooking and crispiness. Avoid overcrowding the pan. Also, don’t be afraid to bake them for a minute or two longer if they don’t seem fully crisped up – just keep a close eye on them to prevent burning!
Spooky Baked Halloween Chips
Create fun, spooky-shaped baked tortilla chips perfect for Halloween snacking. Easy to make and customizable with your favorite seasonings.
Ingredients
-
4 flour tortillas (gluten-free or grain-free, as needed)
-
Avocado oil spray
-
Salt
-
Garlic powder
-
Paprika
-
Chili powder
Instructions
-
Step 1
Preheat your oven to 375°F (190°C). -
Step 2
Lightly spray both sides of each tortilla with avocado oil. -
Step 3
Sprinkle the tortillas evenly with salt, garlic powder, paprika, and chili powder. -
Step 4
Use Halloween cookie cutters to cut shapes from the seasoned tortillas. You can also cut them into triangles or strips. -
Step 5
Arrange the cut tortilla shapes in a single layer on a baking sheet. -
Step 6
Bake for 8-12 minutes, or until the chips are golden brown and crisp. Watch them closely to prevent burning. -
Step 7
Let the chips cool on the baking sheet before serving.
Important Information
Nutrition Facts (Per Serving)
It is important to consider this information as approximate and not to use it as definitive health advice.
Allergy Information
Please check ingredients for potential allergens and consult a health professional if in doubt.