Peanut Butter Spider Cookies-Spooky Halloween Fun
Peanut Butter Spider Cookies are more than just a treat; they’re a gateway to nostalgic fun and delicious memories. There’s something undeniably charming about these spooky delights, making them a perennial favorite, especially as autumn approaches and Halloween festivities beckon. What is it about a simple peanut butter cookie adorned with chocolatey spider legs that captures our hearts? Perhaps it’s the perfect balance of sweet and salty, the comforting richness of peanut butter, or the sheer joy of creating something playful. These Peanut Butter Spider Cookies are incredibly easy to make, proving that a little bit of creativity can transform a classic into a showstopper. They’re perfect for classroom parties, family baking sessions, or simply when you crave a bite of whimsical deliciousness. Get ready to delight your taste buds and your imagination!
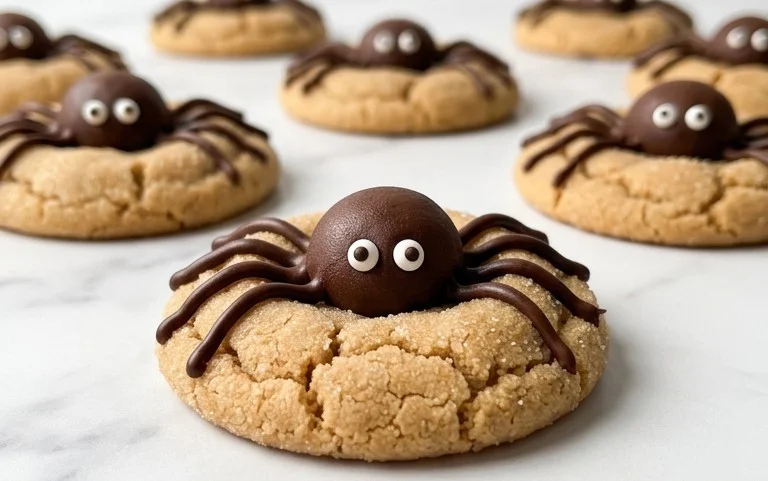
Peanut Butter Spider Cookies: A Spooktacularly Delicious Treat!
Get ready to delight your taste buds and impress your guests with these absolutely adorable and incredibly tasty Peanut Butter Spider Cookies! Perfect for Halloween parties, bake sales, or just a fun afternoon baking project, these cookies combine the comforting classic flavor of peanut butter with a playful, spooky decoration. They’re surprisingly easy to make, and the “spider” element is guaranteed to bring smiles.
The magic of these cookies lies in their simple yet satisfying peanut butter base, which bakes up to a delightful chewiness with a hint of crispness. The real fun begins when we transform them into little arachnids with the help of mini peanut butter cups and candy eyeballs. Trust me, even the most arachnophobic among us will find these too cute to resist!
Ingredients:
- ½ cup (113g) unsalted butter (1 stick, room temperature)
- ½ cup (107g) brown sugar
- ⅓ cup (66g) granulated sugar
- ¾ cup (201g) creamy peanut butter (not natural)
- 1 large egg
- 1 tsp vanilla extract
- 1 ½ cups (180g) all purpose flour
- 1 tsp baking soda
- ½ tsp baking powder
- ½ tsp salt
- Granulated sugar (for rolling the cookies)
- Mini Reese’s Peanut Butter Cups
- ½ cup (85g) semi-sweet chocolate chips (for melting)
- ½ tsp neutral oil (for melting)
- Candy eye balls.
Crafting Your Creepy Critters: The Baking Process
Let’s get our hands a little floury and our kitchens smelling amazing! This recipe is designed to be straightforward, so even if you’re a beginner baker, you’ll be whipping up a batch of these spider cookies in no time.
Step 1: Creaming the Foundation
First things first, we need to create a luscious base for our cookies. In a large mixing bowl, combine your room temperature unsalted butter, brown sugar, and granulated sugar. If your butter isn’t quite soft enough, you can gently warm it for just a few seconds in the microwave, but be careful not to melt it completely. We want it to be soft and pliable, like softened cream cheese. Using an electric mixer (handheld or stand mixer), beat these ingredients together on medium speed until they are light, fluffy, and well combined. This process incorporates air, which will contribute to the cookie’s texture. Scrape down the sides of the bowl as needed to ensure everything is evenly mixed.
Step 2: Adding the Peanut Butter and Wet Ingredients
Now for the star of the show – peanut butter! Add your creamy peanut butter (make sure it’s not the natural kind that separates, as it can affect the texture) to the creamed butter and sugar mixture. Beat again until everything is smoothly incorporated. Next, crack in your large egg and add the vanilla extract. Beat once more until the egg is fully combined and the mixture is smooth and homogenous. This is where that wonderful peanut butter aroma really starts to fill your kitchen!
Step 3: Bringing the Dry Ingredients Together
In a separate, medium-sized bowl, whisk together the all-purpose flour, baking soda, baking powder, and salt. Whisking helps to distribute the leavening agents evenly, preventing any pockets of bitterness or uneven rising. Gradually add this dry ingredient mixture to the wet ingredient mixture, mixing on low speed until just combined. Be careful not to overmix the dough at this stage, as overmixing can lead to tough cookies. Stop mixing as soon as you no longer see streaks of flour. The dough will be quite soft at this point.
Step 4: Shaping the Spider Bodies
Now it’s time to give our spiders their bodies! Take about 1 tablespoon of dough and roll it into a ball. Then, roll the dough ball in the granulated sugar you set aside. This sugar coating will give the cookies a lovely crunch and a slightly sparkly finish. Place the sugared dough balls about 2 inches apart on a baking sheet lined with parchment paper. Parchment paper is your friend here; it prevents sticking and makes for easy cleanup. Don’t flatten the dough balls; they will spread slightly as they bake.
Step 5: Baking and Embellishing Your Spiders
Preheat your oven to 350°F (175°C). Bake the cookies for 10-12 minutes, or until the edges are lightly golden brown and the centers look slightly underbaked. They will continue to set as they cool. While the cookies are baking, prepare your spider decorations. Cut your Mini Reese’s Peanut Butter Cups in half. This will create the spider’s body.
Once the cookies come out of the oven, let them cool on the baking sheet for about 5 minutes before transferring them to a wire rack to cool completely. This is crucial because warm cookies are delicate and can break easily.
As the cookies cool, melt your semi-sweet chocolate chips with the ½ tsp of neutral oil. You can do this in a microwave-safe bowl in 30-second intervals, stirring between each interval until smooth, or use a double boiler. The oil helps to make the melted chocolate smoother and easier to work with.
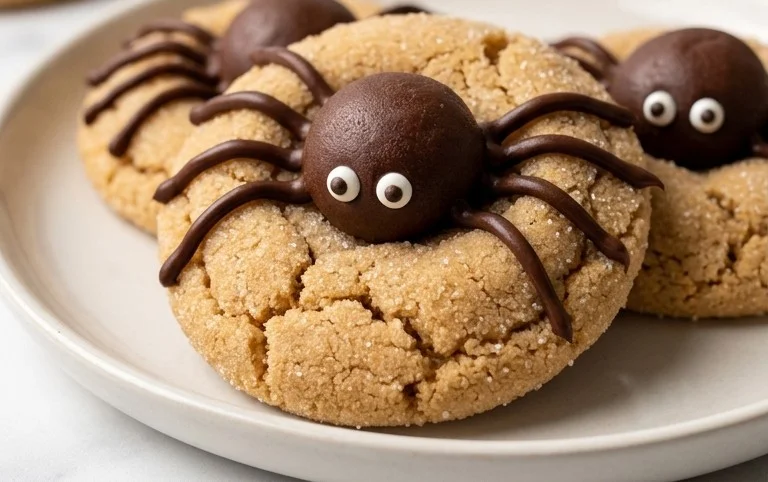
Now for the fun part! Once the cookies are completely cool, place a dollop of melted chocolate on the underside of one half of a Mini Reese’s Peanut Butter Cup and press it onto the top of a cookie to create the spider’s body. Then, use a small amount of melted chocolate to attach two candy eyeballs to the peanut butter cup “body.” For the spider legs, you can use a toothpick dipped in melted chocolate to draw thin lines extending from the sides of the peanut butter cup body. Get creative with how you position the legs! Let the chocolate set completely before handling or serving your Spooktacular Peanut Butter Spider Cookies. Enjoy!
Conclusion:
There you have it – the ultimate guide to crafting these delightful Peanut Butter Spider Cookies! This recipe is fantastic because it’s incredibly easy to follow, making it perfect for bakers of all skill levels, and the results are simply spooktacular! The combination of rich peanut butter flavor with that adorable spider decoration is a guaranteed crowd-pleaser, whether you’re preparing for Halloween or just craving a fun treat. These cookies are wonderful served alongside a glass of cold milk, or even incorporated into a dessert platter for a party. They also make a fantastic activity to do with kids, letting them get creative with their own spider designs.
Don’t be afraid to experiment with variations! You could add chocolate chips to the dough for an extra layer of indulgence, or use different colored icing to create unique spider patterns. For an even more intense peanut butter flavor, consider using crunchy peanut butter. I highly encourage you to give these Peanut Butter Spider Cookies a try; they are a simple yet incredibly rewarding baking project that’s sure to bring smiles and sweet satisfaction.
Frequently Asked Questions:
Can I make these cookies ahead of time?
Absolutely! These Peanut Butter Spider Cookies store wonderfully in an airtight container at room temperature for up to 3-4 days. They are actually even better the next day as the flavors meld together.
What’s the best way to store the leftover icing?
If you have leftover icing, cover it tightly with plastic wrap, pressing the wrap directly onto the surface of the icing to prevent a skin from forming. You can then store it in the refrigerator for a few days. Before using again, let it come to room temperature and stir well.
Peanut Butter Spider Cookies
Spooky and delicious peanut butter cookies decorated to look like spiders, perfect for Halloween or any arachnid-themed fun. These cookies feature a rich peanut butter base, chocolate chip spider legs, and candy eyes.
Ingredients
-
½ cup (113g) unsalted butter (1 stick, room temperature)
-
½ cup (107g) brown sugar
-
⅓ cup (66g) granulated sugar
-
¾ cup (201g) creamy peanut butter (not natural)
-
1 large egg
-
1 tsp vanilla extract
-
1 ½ cups (180g) all purpose flour
-
1 tsp baking soda
-
½ tsp baking powder
-
½ tsp salt
-
Granulated sugar (for rolling the cookies)
-
Mini Reese’s Peanut Butter Cups
-
½ cup (85g) semi-sweet chocolate chips (for melting)
-
½ tsp neutral oil (for melting)
-
Candy eye balls
Instructions
-
Step 1
Preheat oven to 350°F (175°C). Line baking sheets with parchment paper. -
Step 2
In a large bowl, cream together the softened butter, brown sugar, and granulated sugar until light and fluffy. -
Step 3
Beat in the peanut butter, egg, and vanilla extract until well combined. -
Step 4
In a separate bowl, whisk together the all-purpose flour, baking soda, baking powder, and salt. -
Step 5
Gradually add the dry ingredients to the wet ingredients, mixing until just combined. Do not overmix. -
Step 6
Roll dough into 1-inch balls and then roll each ball in granulated sugar. Place on prepared baking sheets. -
Step 7
Bake for 9-11 minutes, or until edges are lightly golden. Let cool on baking sheets for a few minutes before transferring to wire racks to cool completely. -
Step 8
To make the spiders, cut Mini Reese’s Peanut Butter Cups in half horizontally. These will be the spider bodies. -
Step 9
Melt the semi-sweet chocolate chips with the neutral oil in a microwave-safe bowl in 30-second intervals, stirring in between, until smooth. -
Step 10
Pipe or spoon melted chocolate onto the cooled cookies to create spider legs. Immediately place the candy eyeballs onto the chocolate. Attach the peanut butter cup halves as the spider bodies.
Important Information
Nutrition Facts (Per Serving)
It is important to consider this information as approximate and not to use it as definitive health advice.
Allergy Information
Please check ingredients for potential allergens and consult a health professional if in doubt.