Apple Pie Cookies – Bite Apple Pies
Apple Pie Cookies, also affectionately known as 4-Bite Apple Pies, are the ultimate dessert innovation for anyone who adores the comforting, classic taste of apple pie but craves something a little more bite-sized and convenient. Imagine all the warm, spiced apple filling and flaky, buttery crust you love, perfectly portioned into delightful little packages that are ideal for sharing, gifting, or simply enjoying as a solo treat. We all have those moments when a whole pie feels like too much, but the craving for that familiar apple pie flavor is undeniable. That’s precisely where these marvelous Apple Pie Cookies step in, offering that same heartwarming experience without the commitment of a full dessert. What makes them truly special is their ingenious design – they capture the essence of a traditional apple pie in a format that’s both charming and incredibly satisfying, making them an instant crowd-pleaser and a personal favorite of mine.
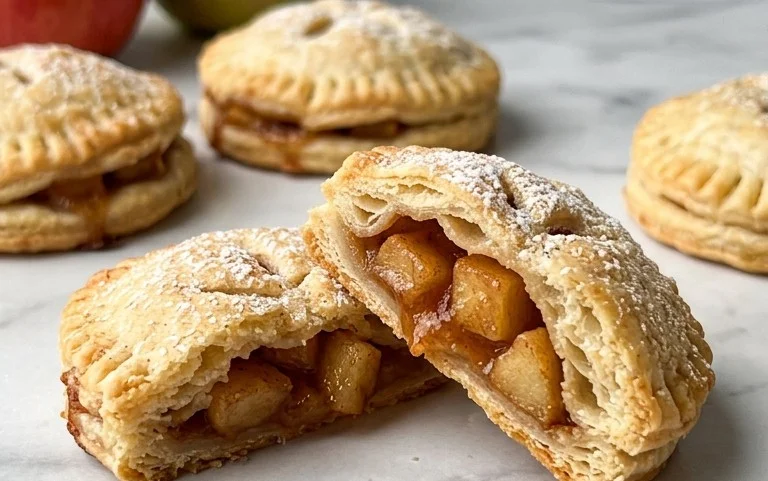
Apple Pie Cookies (aka: 4-Bite Apple Pies)
Are you craving the comforting, spiced goodness of apple pie but find yourself short on time or just want something a little more… bite-sized? Then you are in for a treat! These Apple Pie Cookies, affectionately nicknamed “4-Bite Apple Pies,” capture all the delicious essence of a classic apple pie in a perfectly portioned, portable package. They’re ideal for gatherings, a delightful afternoon pick-me-up, or even a fun baking project with kids. The magic lies in creating a warm, gooey apple filling that’s nestled within flaky, buttery pie crust. Let’s get baking!
Ingredients:
- 1 T. butter
- 2 ½ c. peeled chopped apples
- 1/4 c. water
- 3 T. granulated sugar
- 2 T. brown sugar
- 1 ½ tsp. cornstarch
- 1/4 tsp. ground cinnamon
- 1/8 tsp. salt
- pinch of ground nutmeg
- pinch of ground cloves
- Pie crust for a two-crust pie, store-bought or use your favorite homemade recipe
- 1 large egg
- 1/4 tsp. water
- sanding sugar or granulated sugar for sprinkling on top (optional)
Preparing the Delicious Apple Filling
The heart of these little pies is, of course, the apple filling. This step is crucial for developing that rich, spiced apple flavor we all love.
1. In a medium saucepan, melt the 1 tablespoon of butter over medium heat. Once melted, add your 2 ½ cups of peeled and chopped apples. I like to chop my apples into pieces that are about ½ inch in size; this ensures they cook down to a tender, yet still slightly discernible texture. If the pieces are too large, they might remain too firm, and if they’re too small, they can turn into applesauce.
2. Pour in the ¼ cup of water, then add the 3 tablespoons of granulated sugar and 2 tablespoons of brown sugar. The combination of both sugars provides a lovely depth of flavor and caramel notes. Stir in the ¼ teaspoon of ground cinnamon, ⅛ teaspoon of salt, a pinch of ground nutmeg, and a pinch of ground cloves. The nutmeg and cloves add that quintessential warm spice blend that makes apple pie so comforting. Bring this mixture to a simmer, then reduce the heat to low and cook, stirring occasionally, for about 8-10 minutes, or until the apples have softened slightly. You don’t want them to be mushy at this stage, just tender.
3. In a small bowl, whisk together the 1 ½ teaspoons of cornstarch with an additional tablespoon of cold water (this is not listed in the core ingredients but is a standard practice for making a cornstarch slurry to avoid lumps). This slurry is the key to thickening our apple filling into that perfect, luscious consistency. Gradually whisk the cornstarch mixture into the simmering apples. Continue to cook, stirring constantly, for another 1-2 minutes, until the filling has thickened nicely. Remove the saucepan from the heat and let the apple filling cool completely. This is important; if the filling is too hot, it can melt the pie crust and make it difficult to work with. You can speed up the cooling process by transferring the filling to a shallow bowl and placing it in the refrigerator.
Assembling Your 4-Bite Apple Pies
Now comes the fun part – assembling these adorable little pies! Using a good quality pie crust is important here. Whether you’re using store-bought or your favorite homemade recipe, make sure it’s well-chilled.
1. Preheat your oven to 375°F (190°C). Line two baking sheets with parchment paper or silicone baking mats. This will prevent any sticky filling from adhering to your pans and makes cleanup a breeze.
2. Unroll or roll out your pie crust dough. For these bite-sized wonders, I like to use a round cookie cutter or biscuit cutter that’s about 3-4 inches in diameter. Cut out as many circles as you can from your dough. You’ll need two circles for each cookie – one for the bottom and one for the top. Gather the scraps, gently re-roll them, and cut out more circles until you’ve used up most of the dough.
3. Take one pie crust circle and place it on your prepared baking sheet. Spoon about 1-2 tablespoons of the cooled apple filling into the center of the circle, leaving about a ½-inch border around the edge. Be careful not to overfill, or the filling might bubble out excessively during baking.
4. In a small bowl, whisk together the 1 large egg with ¼ teaspoon of water to create an egg wash. This will help to seal the edges of your cookies and give them a beautiful golden sheen when baked. Lightly brush the edges of the bottom pie crust circle with the egg wash.
5. Place a second pie crust circle on top of the filling. Gently press down the edges of the top crust to seal it to the bottom crust. You can use the tines of a fork to crimp the edges for a decorative finish and to ensure a good seal. If you want a more traditional pie look, you can also cut small slits in the top crust to allow steam to escape. Repeat this process for all your cookies.
Baking to Golden Perfection
The final stage is baking, where the magic truly happens and those delicious aromas fill your kitchen.
1. Once all your Apple Pie Cookies are assembled, brush the tops of each cookie with the remaining egg wash. If you’re using sanding sugar or granulated sugar for sprinkling, do so now. The sugar will caramelize slightly in the oven, adding a delightful crunch and extra sparkle.
2. Bake for 18-22 minutes, or until the crust is golden brown and the filling is bubbly. Keep an eye on them during the last few minutes of baking, as oven temperatures can vary. You want that beautiful, inviting golden hue.
3. Let the Apple Pie Cookies cool on the baking sheets for about 5-10 minutes before transferring them to a wire rack to cool completely. They will be very hot and the filling will be molten. Allowing them to cool slightly will set the filling and make them easier to handle.
These 4-Bite Apple Pies are best enjoyed warm or at room temperature. They are a delightful treat that brings all the joy of apple pie without the fuss of a full-sized dessert. Enjoy every delicious bite!
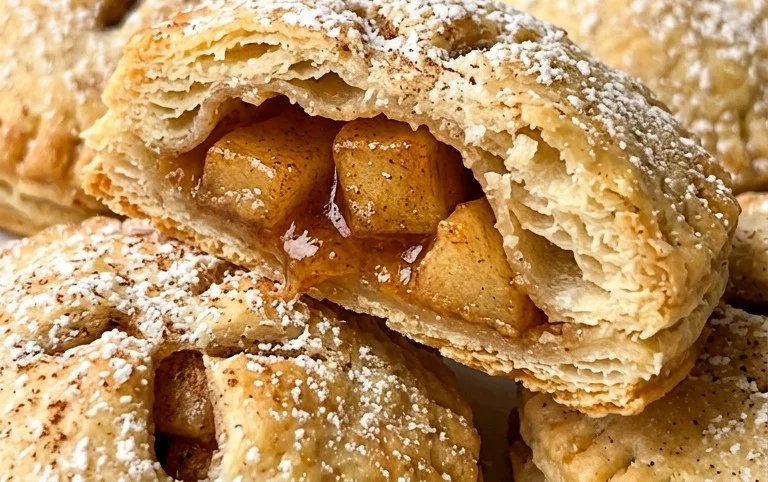
Conclusion:
I hope you’ve enjoyed learning how to make these delightful Apple Pie Cookies, also affectionately known as 4-Bite Apple Pies! These little wonders are a fantastic way to capture all the warm, comforting flavors of a classic apple pie in a perfectly portioned, easy-to-handle cookie. They are wonderfully versatile, making them ideal for bake sales, holiday gatherings, or simply as an afternoon treat with a cup of tea or coffee. The buttery, flaky crust combined with the spiced apple filling is truly irresistible.
Serving suggestions abound! Enjoy them warm right out of the oven for an extra gooey center, or let them cool completely for a crisper bite. They are also delicious with a dollop of whipped cream or a scoop of vanilla ice cream. For variations, consider adding a pinch of nutmeg or cardamom to the apple filling for a more complex spice profile, or perhaps a sprinkle of cinnamon sugar on top before baking for an added crunch and sweetness.
I truly encourage you to give this Apple Pie Cookies recipe a try. It’s a rewarding baking experience that delivers big on flavor and charm. Don’t be intimidated; they are surprisingly straightforward to assemble and the results are absolutely worth it!
Frequently Asked Questions:
Q: Can I use different types of apples for the filling?
A: Absolutely! While a firm, slightly tart apple like Granny Smith is a great choice, you can certainly experiment with other varieties. Honeycrisp, Fuji, or Gala apples will also work beautifully, often providing a sweeter filling. A mix of apple types can add wonderful complexity to the flavor.
Q: How should I store these Apple Pie Cookies?
A: Store your cooled Apple Pie Cookies in an airtight container at room temperature for up to 3-4 days. If you prefer them slightly warmed, you can gently reheat them in a low oven for a few minutes.
Q: Can I make the dough ahead of time?
A: Yes, the dough for these 4-Bite Apple Pies can be made a day or two in advance and stored in the refrigerator. Just ensure it’s well-wrapped to prevent drying out. You may need to let it sit at room temperature for a few minutes before rolling if it becomes too firm.
Apple Pie Cookies (aka: 4-Bite Apple Pies)
Delightful bite-sized apple pies, perfect for a sweet treat.
Ingredients
-
1 T. butter
-
2 ½ c. peeled chopped apples
-
1/4 c. water
-
3 T. granulated sugar
-
2 T. brown sugar
-
1 ½ tsp. cornstarch
-
1/4 tsp. ground cinnamon
-
1/8 tsp. salt
-
pinch of ground nutmeg
-
pinch of ground cloves
-
Pie crust for a two-crust pie, store-bought or use your favorite homemade recipe
-
1 large egg
-
1/4 tsp. water
-
sanding sugar or granulated sugar for sprinkling on top (optional)
Instructions
-
Step 1
Melt butter in a saucepan over medium heat. Add chopped apples and 1/4 cup water. -
Step 2
Cook, stirring occasionally, until apples are tender, about 8-10 minutes. Stir in granulated sugar, brown sugar, cornstarch, cinnamon, salt, nutmeg, and cloves. Cook for 1 minute more, stirring constantly. -
Step 3
Let the apple mixture cool completely. Meanwhile, prepare the pie crust according to package directions for a two-crust pie. Cut out circles of dough to fit into mini muffin tins or create small hand pies. -
Step 4
Spoon a small amount of the cooled apple filling into the center of each dough circle. Fold the dough over to create a half-moon shape (for hand pies) or seal the edges of the dough in the mini muffin tins. -
Step 5
Whisk together the egg and 1/4 tsp. water to create an egg wash. Brush the tops of the cookies with the egg wash and sprinkle with sanding sugar or granulated sugar, if desired. -
Step 6
Bake according to pie crust package directions, or until golden brown and bubbly.
Important Information
Nutrition Facts (Per Serving)
It is important to consider this information as approximate and not to use it as definitive health advice.
Allergy Information
Please check ingredients for potential allergens and consult a health professional if in doubt.